


iQ4/Neo Home Alarm System FAQs
Create a new login
Creating logins is a breeze, and here’s how:
- Only the Customer Website can help you make logins, this will not be able to be completed via the app.
- If your chosen name isn’t working, it might already be taken.
- You can make as many logins as you need. Need group logins? See “Create a new group login.”
Just a heads-up: Only Master Control folks can make new logins.
Time to Create a Login
Using the Customer Website:
- Log into the Customer Website.
- Click on “Users.”
- Choose “Manage Logins.”
- Click “Add a Login.”
- Enter the new login’s email address.
- In the Login Name field, enter the login name.
- Choose your preferred language.
- Click “Save.”
- Setting Permissions: On the Manage Login Permissions page, select what this new login can do:
- On the Manage Login Permissions page, select either Master Control, Full Control, Read Only, Limited Device Access, or Custom. This will give the login permission to access various website features. For a description of each permission, see Permissions.
- If no permissions are selected and saved:
- On the Customer Website, the login is able to view only the welcome card, sensors, and activity. The login is not able to perform any changes except to their Login Information.
- On the Customer app, the login is able to view only trouble alerts, weather, and history. The login is not able to perform any changes except to their App Settings.
| Permission | Description |
| Master Control | Logins with Master Control will have all of the permissions of the primary account user, including the ability to manage website logins and change profile information such as the primary email address and phone number for the account.
Master Control logins will not receive certain types of account notifications that go only to the primary user (e.g., user code changes and invalid email addresses for secondary contacts). |
| Full Control | Logins with Full Control will have all of the Full Control permissions described in the Custom permissions sections, along with most of the Customer Website and mobile app functionality available to the primary account user.
They will not have the ability to manage website logins, and they will not receive certain types of account notifications that go only to the primary user (e.g., user code changes and invalid email addresses for secondary contacts). |
| Read Only | Logins with Read Only permissions will be able to see most of the Customer Website pages and settings for the account, including the User Codes and Live/Saved Video pages, but will not be able to make any changes to account settings, arming state, device status or view saved video. These logins cannot see the Manage Logins page. |
| Limited Device Access | Logins with limited device access will only be able to control and observe the specified devices. Note: Access to view the account’s activity (i.e., Activity, Reports, Wellness, etc.) is restricted on the Customer Website and app when the Limited Device Access permission is chosen. |
| Custom | You can create a Custom role to fit your exact requirements for this login. Use the checkboxes below to include a specific type of permission, and then decide what level of control to provide the login (Read Only or Full Control). You can always come back and change this in the future. Note: You will be able to view additional website and mobile content not listed in the Custom permissions, such as current system status, system history, their own password settings, and the system equipment list. |
Remember: New logins get an email with their login name and a link to set up a password. If the email isn’t showing up, double-check the entered email and the junk/spam folder.
And there you go – a new login ready to go!
Adding Users to Your System
User Types and Limits
You can set up to 242 users in your system. Each user can have a unique name and a specific level of access that you control.
- Master User: This type has full access to panel functions, cameras, and system settings.
- Regular User: These users can access panel functions and cameras, but they can’t change system settings.
- Guest User: Use this type for temporary users who need to arm or disarm the system.
You can also set an expiration date for a user code. This will automatically disable their access on a specific date.
Adding a New User
Here’s how you can add a new user to your system:
- Swipe down from the top of the screen to access the main settings.
- Tap on “SETTINGS.”
- Tap on “ADVANCED SETTINGS.”
- Enter your code to authenticate.
- Tap on “User Management.”
- Choose “Add User.”
On the “Add User” screen, you can customise the new user’s name, create a user code, and select their user type (Master, User, or Guest).
Deleting a system user
Important: User codes cannot be deleted while the security system is armed. Verify the security system is disarmed before attempting to delete a user code remotely.
Using the Customer App:
- Log in to the Customer app.
- Tap the menu.
- Go to “Users.”
- Find the user you want to delete.
- Tap “More.”
- Hit “Delete” twice.
Confirm Your Choice:
- The first “Delete” is for the user.
- The second “Delete” confirms you want to remove the user and their linked addresses.
Using the Customer Website:
- Log in to the Customer Website.
- Click on “Users.”
- Find the user you want to delete.
- Click “More.”
- Hit “Delete” twice.
Confirm Your Choice:
- The first “Delete” is for the user.
- The second “Delete” confirms you’re removing the user along with their linked addresses.
Arming the Alarm System
Getting ready to Arm
- Tap the padlock Icon that’s unlocked. It’s your arming button
- Two options will pop up: “Stay- Someone will be home” and “Away- Home will be empty”
Choose Your Arming Mode
- Arming Stay: This mode only arms your doors and windows
- Arming Away: This mode arms doors, windows and motion detectors.
Disarming the Alarm System
Ready to Disarm
- Tap the padlock Icon that’s locked. It’s your disarming button.
- You’ll need to put in your correct code.
Stay Calm and Enter your code
- If you don’t enter the code in time, the alarm might go off.
- If the alarm sounds, the IQ Panel screen turns red and the siren sounds.
- To stop it, just tap the screen and type in your code.
Bypassing Zones- Simple Steps!
Before You Start
Remember, your system must be disarmed.
Getting Started
- Tap the padlock Icon that’s unlocked. This gets you to arming options.
- To view more arming options, Tap the “>>” icon on the right.
Choose the Zone to Bypass
- Just touch the circle next to the sensor you want to bypass.
- Now you’re set for the arming sequence.
Pick Your Arming Mode
- Choose “Stay” or “Away” mode.
- You’re all set, even with the zones you’ve bypassed.
Emergency Help Made Easy!
When You Need Help Fast
In the bottom right corner, there’s an icon. Just tap it for emergencies.
Choose Your Emergency Type
- Need Police? Tap “Police”
- For Fire Help, tap “Fire”
- In any other emergency, tap “Emergency”
Changing your Mind?
- If you tapped “Emergency” but things are okay, tap it again.
- Remember, even if you cancel, Ultimate Security might check on you to make sure you’re okay.
Getting a New Phone? Here’s What You Need to Know:
Smooth Switching Tips
If you’re changing to a new phone, don’t worry! Just keep these things in mind to avoid any hiccups”
- Update your Main Contact
If your new phone is now your main device, make sure to update your primary contact number if its different.
For detailed instructions on updating your primary phone contact check out the “Change a phone number” guide.
- Update your Rules and Notifications
When you switch phones, make sure your rules and notifications are in sync. Follow these steps for a smooth transition:
- Update Recipients: Add your new phone as a contact for rules and notifications. This ensures you keep getting important alerts.
- Remove Old Phone: Don’t forget to remove your old phone from rules and notifications. We want to avoid any mix-ups.
- com Places- Your Phone’s Location
Keep Your Location Up-to-Date
When you switch to a new phone, don’t forget to update your Alarm.com Places. Here’s how:
- Edit Your Geo-Devices: Remove your old phone from the list of Geo-Devices and add your new phone. This way, your location stays accurate.
- Two Factor Authentication
When you get a new phone, make sure your Two Factor Authentication info is up to date. Follow these simple steps:
- Disable and Re-enable: Turn off Two Factor Authentication, then turn it back on. This way, your new phone will be linked.
Updating Your Email Address
Important: The email address of secondary logins cannot be changed once created. Delete the secondary login with the incorrect email address and create a new login with the correct email address. For more information about how to delete secondary logins, refer to Delete a login.
Using the Customer App:
- Log in to the Customer app with your main account.
- Tap the menu icon.
- Select “Login Information.”
- Tap “Email Address.”
- Enter your new email in the field.
- For security, type your current password.
- Hit “Save.”
Using the Customer Website:
- Log in to the Customer Website with your main account.
- Click on “Settings.”
- Choose “Login Information.”
- In the Login Information section, click “Email Address.”
- Enter your new email.
- Type your current password for security.
- Click “Save.”
Change or Reset a Password
Note: The new password cannot be the same as the previous password. The new password must be at least 10 characters, including at least one letter, one number, and one special character. It is recommended to only use passwords that are indicated as Strong by the password strength indicator.
To change the existing Password:
Using the Customer App:
- Open the Customer app and log in.
- Tap the menu icon.
- Go to “Login Information.”
- Select “Password.”
- Type your current password.
- Enter your new password.
- Confirm your new password.
- If needed, choose “Log out all devices” to make sure old passwords don’t work.
- Hit “Save.”
Using the Customer Website:
- Log into the Customer Website.
- Click on “Settings.”
- Choose “Login Information.”
- Click “Password.”
- Enter your current password.
- Put in your new password.
- Confirm your new password.
- If needed, tick “Log out all devices” for extra security.
- Click “Save.”
Remember, logging out all devices is useful if you’ve changed devices or lost one. Your safety matters!
To Reset a Password
To reset your password, follow these simple steps:
- Go to the Login Help page.
- Enter your username.
- You’ll get an email with a link for password reset.
- Click the link and answer the security question.
- Your password will be reset!
Remember, the link in the email is valid for 24 hours. If it doesn’t work on your mobile, give it a shot on a computer.
Brighten Up Your Screen - It's Easy!
Want to adjust the brightness? No problem! Just follow these steps:
- Swipe down from the top of the screen to get to the settings.
- Look for the brightness icon.
- Slide left to make it dimmer or right to make it brighter.
That’s it! Your screen’s brightness, your way.
Create a sensor activity notification
Using the Customer App:
Got a new sensor? Time to set up alerts! Here’s how:
- Log in to the Customer app.
- Tap the menu.
- Choose “Notifications.”
- Tap “Settings.”
- Hit “Add.”
- Pick “Sensor Activity” under “Create Your Own.”
- Name your notification rule.
- Choose which sensors to monitor.
- Not seeing your sensor? Make sure monitoring is on. Need help? Check out “Turn sensor activity monitoring on/off.”
- Decide when you want notifications:
- “At All Times”: Anytime a sensor is activated.
- “Only During the Following Times”: Choose specific times.
- Want special filtering? Select your options.
- Add recipients from your Address Book.
- Verify your settings.
- Hit “Save.”
Using the Customer Website:
Setting up alerts on the Customer Website?
- Log in to the Customer Website.
- Click “Notifications.”
- Click “New Notification.”
- Choose “Sensor Activity.”
- Name your notification rule.
- Select the sensors you want to monitor.
- Can’t find a sensor? Make sure activity monitoring is on. Check “Turn sensor activity monitoring on/off.”
- Pick when you want notifications:
- “At All Times”: For every sensor activation.
- “Only During the Following Times”: Set specific times.
- Add any filtering you want.
- Click “Add.”
- Add recipients from your Address Book or add a new one.
- Check your settings.
- Click “Save.”

Setting up the Alarm.com Mobile Application
- Download the Application
You can easily download the free Alarm.com app for your phone and tablet from both the Google Play Store and the Apple App Store.
Plus, you have the flexibility to manage and keep an eye on your system using other devices like your Apple Watch, Apple TV, Amazon Fire TV, Amazon Echo, and Google Home.
- Login with your Primary Email and password login
When you log in as the main user, you’ll gain access to exciting app features. Enable the Notifications.
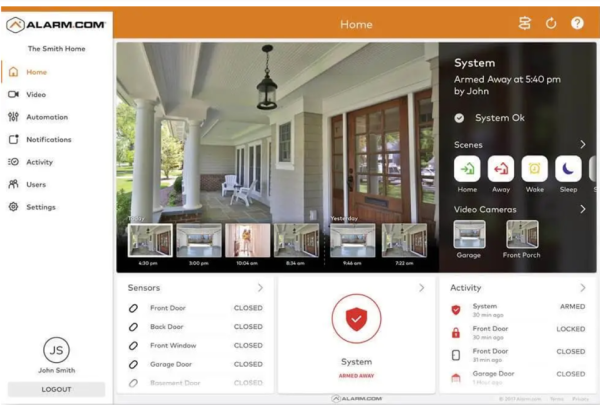
- Navigate the Dashboard
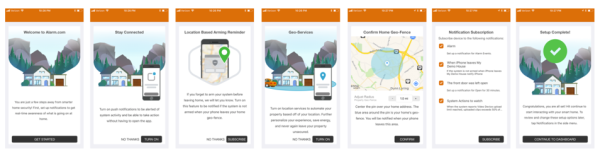
Primary customer logins have immediate access to engaging app features. Simply click on the Notifications option to activate Push Notifications. You can conveniently add, modify, or oversee your push, text, and email notifications while you’re on the move. Receive a helpful “System Not Armed” notification as a reminder in case you happen to forget to arm your system while you’re away from home. Primary customer logins are prompted to:
- Turn on push notifications: This allows the user to receive notifications through the Alarm.com Customer app.
- Create a location-based arming reminder: This allows the user to receive a reminder to arm the system if the mobile device leaves the Geo-Fence.
- Turn on Alarm.com Places: This allows the user to automate their system based on the location of the mobile device.
- Create their first Geo-Fence: This allows the user to adjust the Geo-Fence’s location and radius.
- Subscribe the mobile device to notifications: This allows the user to select which notifications they wish to receive.
The following is an example of the process the user goes through during the Mobile App Setup wizard:
Logging in to your ADC Online Account
- Sign In:
Access your Alarm.com account to control and monitor your system right from the Homepage. You should have received your login details via email from Alarm.com to setup your account.
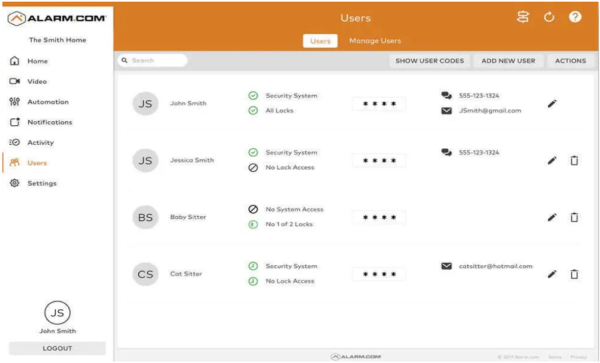
- Create User Codes:
Establish individual user codes for your family, friends, dog walker, nanny, or anyone who needs to arm or disarm your panel.
- Navigate to Users > Add New User
Furthermore, you can also allocate customized access for users to specific entry points (such as security systems, locks, etc.), whether it’s for the long term or a temporary arrangement within a designated timeframe.
- Go to Users > Actions > Add Temporary User
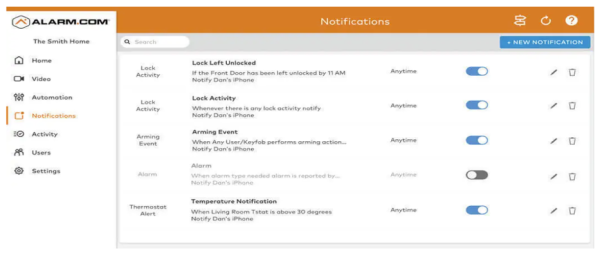
- Set Up Notifications:
Stay informed with immediate alerts (via text, email, or push notifications) for various system events. This includes instances like system alarms, reminders about forgetting to arm the system, or doors being left open. You have the flexibility to modify these alerts through the Alarm.com Mobile App.
Access Notifications > + New Notification > Choose from default options or personalize your own > + Add Recipient > Save Notification
- Activate Geo-Services:
Establish Geo-Fences to set up rules and alerts based on your location, automatically adapting your home’s settings. Geo-Services uses your smartphone’s location to recognize when you’re coming or going from home. Remember, you need to enable location services in the Mobile App before setting up Geo-Services on the Alarm.com website.
Access Settings > Geo-Services > + Add a Fence > Position the pin in your desired location

Change or Reset a Password
Note: The new password cannot be the same as the previous password. The new password must be at least 10 characters, including at least one letter, one number, and one special character. It is recommended to only use passwords that are indicated as Strong by the password strength indicator.
To change the existing Password:
Using the Customer App:
- Open the Customer app and log in.
- Tap the menu icon.
- Go to “Login Information.”
- Select “Password.”
- Type your current password.
- Enter your new password.
- Confirm your new password.
- If needed, choose “Log out all devices” to make sure old passwords don’t work.
- Hit “Save.”
Using the Customer Website:
- Log into the Customer Website.
- Click on “Settings.”
- Choose “Login Information.”
- Click “Password.”
- Enter your current password.
- Put in your new password.
- Confirm your new password.
- If needed, tick “Log out all devices” for extra security.
- Click “Save.”
Remember, logging out all devices is useful if you’ve changed devices or lost one. Your safety matters!
To Reset a Password
To reset your password, follow these simple steps:
- Go to the Login Help page.
- Enter your username.
- You’ll get an email with a link for password reset.
- Click the link and answer the security question.
- Your password will be reset!
Remember, the link in the email is valid for 24 hours. If it doesn’t work on your mobile, give it a shot on a computer.
Create a new login
Creating logins is a breeze, and here’s how:
- Only the Customer Website can help you make logins, this will not be able to be completed via the app.
- If your chosen name isn’t working, it might already be taken.
- You can make as many logins as you need. Need group logins? See “Create a new group login.”
Just a heads-up: Only Master Control folks can make new logins.
Time to Create a Login
Using the Customer Website:
- Log into the Customer Website.
- Click on “Users.”
- Choose “Manage Logins.”
- Click “Add a Login.”
- Enter the new login’s email address.
- In the Login Name field, enter the login name.
- Choose your preferred language.
- Click “Save.”
- Setting Permissions: On the Manage Login Permissions page, select either Master Control, Full Control, Read Only, Limited Device Access, or Custom. This will give the login permission to access various website features. For a description of each permission, see Permissions.
- If no permissions are selected and saved:
- On the Customer Website, the login is able to view only the welcome card, sensors, and activity. The login is not able to perform any changes except to their Login Information.
- On the Customer app, the login is able to view only trouble alerts, weather, and history. The login is not able to perform any changes except to their App
|
Permission |
Description |
|
Master Control |
Logins with Master Control will have all of the permissions of the primary account user, including the ability to manage website logins and change profile information such as the primary email address and phone number for the account. Master Control logins will not receive certain types of account notifications that go only to the primary user (e.g., user code changes and invalid email addresses for secondary contacts). |
|
Full Control |
Logins with Full Control will have all of the Full Control permissions described in the Custom permissions sections, along with most of the Customer Website and mobile app functionality available to the primary account user. They will not have the ability to manage website logins, and they will not receive certain types of account notifications that go only to the primary user (e.g., user code changes and invalid email addresses for secondary contacts). |
|
Read Only |
Logins with Read Only permissions will be able to see most of the Customer Website pages and settings for the account, including the User Codes and Live/Saved Video pages, but will not be able to make any changes to account settings, arming state, device status or view saved video. These logins cannot see the Manage Logins page. |
|
Limited Device Access |
Logins with limited device access will only be able to control and observe the specified devices. Note: Access to view the account’s activity (i.e., Activity, Reports, Wellness, etc.) is restricted on the Customer Website and app when the Limited Device Access permission is chosen. |
|
Custom |
You can create a Custom role to fit your exact requirements for this login. Use the checkboxes below to include a specific type of permission, and then decide what level of control to provide the login (Read Only or Full Control). You can always come back and change this in the future. Note: You will be able to view additional website and mobile content not listed in the Custom permissions, such as current system status, system history, their own password settings, and the system equipment list. |
Adding Users to Your System
User Types and Limits
You can set up to 242 users in your system. Each user can have a unique name and a specific level of access that you control.
- Master User: This type has full access to panel functions, cameras, and system settings.
- Regular User: These users can access panel functions and cameras, but they can’t change system settings.
- Guest User: Use this type for temporary users who need to arm or disarm the system.
You can also set an expiration date for a user code. This will automatically disable their access on a specific date.
Adding a New User
Here’s how you can add a new user to your system:
- Swipe down from the top of the screen to access the main settings.
- Tap on “SETTINGS.”
- Tap on “ADVANCED SETTINGS.”
- Enter your code to authenticate.
- Tap on “User Management.”
- Choose “Add User.”
On the “Add User” screen, you can customise the new user’s name, create a user code, and select their user type (Master, User, or Guest).
Deleting a system user
Important: User codes cannot be deleted while the security system is armed. Verify the security system is disarmed before attempting to delete a user code remotely.
Using the Customer App:
- Log in to the Customer app.
- Tap the menu.
- Go to “Users.”
- Find the user you want to delete.
- Tap “More.”
- Hit “Delete” twice.
Confirm Your Choice:
- The first “Delete” is for the user.
- The second “Delete” confirms you want to remove the user and their linked addresses.
Using the Customer Website:
- Log in to the Customer Website.
- Click on “Users.”
- Find the user you want to delete.
- Click “More.”
- Hit “Delete” twice.
Confirm Your Choice:
- The first “Delete” is for the user.
- The second “Delete” confirms you’re removing the user along with their linked addresses.
Using the Customer Website:
- Log in to the Customer Website.
- Click on “Users.”
- Find the user you want to delete.
- Click “More.”
- Hit “Delete” twice.
Confirm Your Choice:
- The first “Delete” is for the user.
- The second “Delete” confirms you’re removing the user along with their linked addresses.
Arming the Alarm System
Getting ready to Arm
- Tap the padlock Icon that’s unlocked. It’s your arming button
- Two options will pop up: “Stay- Someone will be home” and “Away- Home will be empty”
Choose Your Arming Mode
- Arming Stay: This mode only arms your doors and windows
- Arming Away: This mode arms doors, windows and motion detectors.
Disarming the Alarm System
Ready to Disarm
- Tap the padlock Icon that’s locked. It’s your disarming button.
- You’ll need to put in your correct code.
Stay Calm and Enter your code
- If you don’t enter the code in time, the alarm might go off.
- If the alarm sounds, the IQ Panel screen turns red and the siren sounds.
- To stop it, just tap the screen and type in your code.
Bypassing Zones- Simple Steps!
Before You Start
Remember, your system must be disarmed.
Getting Started
- Tap the padlock Icon that’s unlocked. This gets you to arming options.
- To view more arming options, Tap the “>>” icon on the right.
Choose the Zone to Bypass
- Just touch the circle next to the sensor you want to bypass.
- Now you’re set for the arming sequence.
Pick Your Arming Mode
- Choose “Stay” or “Away” mode.
- You’re all set, even with the zones you’ve bypassed.
Emergency Help Made Easy!
When You Need Help Fast
In the bottom right corner, there’s an icon. Just tap it for emergencies.
Choose Your Emergency Type
- Need Police? Tap “Police”
- For Fire Help, tap “Fire”
- In any other emergency, tap “Emergency”
Changing your Mind?
- If you tapped “Emergency” but things are okay, tap it again.
- Remember, even if you cancel, Ultimate Security might check on you to make sure you’re okay.
Brighten Up Your Screen - It's Easy!
Want to adjust the brightness on your IQ4 Panel? No problem! Just follow these steps:
- Swipe down from the top of the screen to get to the settings.
- Look for the brightness icon.
- Slide left to make it dimmer or right to make it brighter.
That’s it! Your screen’s brightness, your way.
Getting a New Phone? Here’s What You Need to Know:
Smooth Switching Tips
If you’re changing to a new phone, don’t worry! Just keep these things in mind to avoid any hiccups”
- Update your Main Contact
If your new phone is now your main device, make sure to update your primary contact number if it’s different.
For detailed instructions on updating your primary phone contact check out the “Change a phone number” guide.
- Update your Rules and Notifications
When you switch phones, make sure your rules and notifications are in sync. Follow these steps for a smooth transition:
- Update Recipients: Add your new phone as a contact for rules and notifications. This ensures you keep getting important alerts.
- Remove Old Phone: Don’t forget to remove your old phone from rules and notifications. We want to avoid any mix-ups.
- com Places- Your Phone’s Location
Keep Your Location Up-to-Date
When you switch to a new phone, don’t forget to update your Alarm.com Places. Here’s how:
- Edit Your Geo-Devices: Remove your old phone from the list of Geo-Devices and add your new phone. This way, your location stays accurate.
- Two Factor Authentication
When you get a new phone, make sure your Two Factor Authentication info is up to date. Follow these simple steps:
- Disable and Re-enable: Turn off Two Factor Authentication, then turn it back on. This way, your new phone will be linked.
Updating Your Email Address
Important: The email address of secondary logins cannot be changed once created. Delete the secondary login with the incorrect email address and create a new login with the correct email address. For more information about how to delete secondary logins, refer to Delete a login.
Using the Customer App:
- Log in to the Customer app with your main account.
- Tap the menu icon.
- Select “Login Information.”
- Tap “Email Address.”
- Enter your new email in the field.
- For security, type your current password.
- Hit “Save.”
Using the Customer Website:
- Log in to the Customer Website with your main account.
- Click on “Settings.”
- Choose “Login Information.”
- In the Login Information section, click “Email Address.”
- Enter your new email.
- Type your current password for security.
- Click “Save”
Create an Alarm Notification
Setting Up Alarm Notifications
An alarm notification helps you stay informed about important events at your property. You can receive notifications via email, SMS text messages, or push notifications on your mobile device. Here’s how you can set it up:
Using the Customer App:
- Open the Customer app and log in.
- Tap on the Menu.
- Select Notifications, then go to Settings.
- Click on Add, and then choose Alarm.
- Give your new notification a name.
- Select the types of alarms you want to be notified about.
- Choose the sensors you want to monitor for these alarms.
- Add the recipients who will receive the notifications.
- Confirm your choices and save the notification.
Note: Avoid sending Duress Panic SMS or push notifications to users who might trigger a Duress Code.
Using the Customer Website:
- Log in to the Customer Website.
- Go to Notifications and click New Notification.
- Select Alarm as the notification type.
- Name your new notification rule.
- Choose the types of alarms you want to receive notifications for.
- Decide whether you want to receive notifications for any sensor or specific ones.
- Add the recipients who will receive the notifications.
- Confirm your choices and save the notification.
Note: Avoid sending Duress Panic SMS or push notifications to users who might trigger a Duress Code.
By following these steps, you’ll be all set up to receive alarm notifications that keep you informed about what’s happening at your property.
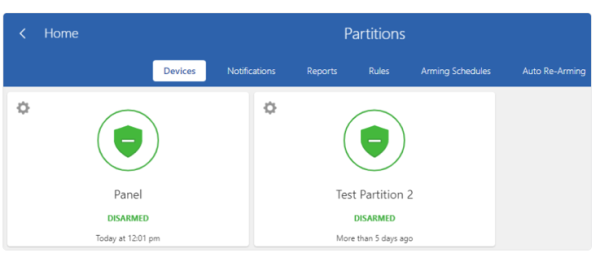
Controlling Multiple Partitions on the Security Panel
Setting Up and Using Multiple Partitions:
When you want to divide your security system into different sections, you can follow these simple steps to manage them conveniently:
- Enable Secondary Partition: To start, go to the security panel settings and enable the secondary partition. Make sure you have linked at least one sensor to it. This will create a new section for you.
- No Extra Costs: Great news! You won’t be charged extra for using or controlling partitions remotely on your account.
- Using the Customer App:
- Set Arming Level: Open your Customer App and choose the section you want to control. Check the box next to the current status of the partition you’re interested in.
- Multiple Partitions: You can choose to control multiple partitions at once. For instance, you can arm multiple partitions for Away mode together.

- Using the Customer Website:
- View and Control: On the Customer Website, your second partition will appear below the first one in the “Current Arming States” section.
- Commands: You can choose different actions for different partitions. For instance, arm some partitions while leaving others disarmed.
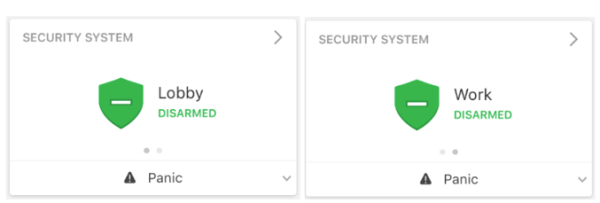
- Controlling Partitions via the Customer App:
- Individual Control: From the app’s home screen, you can easily view and manage separate partitions. Swipe left or right on the partition status to see them. Tap a partition to control it.
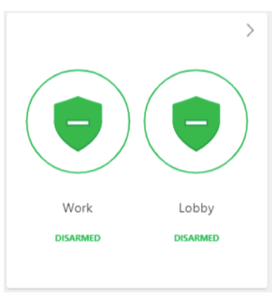
- Controlling Many: If you want to control multiple partitions at once, go to the Security System menu. Use the checkboxes to pick the partitions you want to command.
- Controlling Partitions via the Customer Website:
- Easy Control: On the Customer Website, visit the Security System page. From there, you can select any partition you want and send commands to it.
Remember, you can also refer to the provided images for a visual guide.
Remotely arm and disarm multiple partitions at once
When you have multiple sections in your system, you can easily control each one’s arming and disarming remotely using either the Customer app or the Customer Website. This way, you can customise your security setup just the way you want it.
Using the Customer App:
- Log In: Open up the Customer app and log into your account.
- Navigate to Partitions: Look for the Security System card. You can swipe through the list of partitions if you have more than one. Tap the partition you want to adjust.
- Select Arming State: Once you’re in the desired partition, simply tap it again to select the arming state you want.
Note: If you prefer, you can also change the arming state from the Security System page by tapping “Details” in the Security System card.
Using the Customer Website:
- Log In: Access the Customer Website and log into your account.
- Locate Partitions: On the main page, you’ll find the Security System card. If there are multiple partitions, they will be listed here. Click on the partition you want to control.
- Select Arming State: Once you’re in the partition you want, click it again to choose the desired arming state.
Note: Just like in the app, you can change the arming state from the Partitions page by clicking “Details” in the Security System card.
By following these straightforward steps, you can effortlessly arm and disarm different partitions, ensuring your security system is tailored exactly to your needs.
Create a sensor activity notification
Using the Customer App:
Got a new sensor? Time to set up alerts! Here’s how:
- Log in to the Customer app.
- Tap the menu.
- Choose “Notifications.”
- Tap “Settings.”
- Hit “Add.”
- Pick “Sensor Activity” under “Create Your Own.”
- Name your notification rule.
- Choose which sensors to monitor.
- Not seeing your sensor? Make sure monitoring is on. Need help? Check out “Turn sensor activity monitoring on/off.”
- Decide when you want notifications:
- “At All Times”: Anytime a sensor is activated.
- “Only During the Following Times”: Choose specific times.
- Want special filtering? Select your options.
- Add recipients from your Address Book.
- Verify your settings.
- Hit “Save.”
Using the Customer Website:
Setting up alerts on the Customer Website?
- Log in to the Customer Website.
- Click “Notifications.”
- Click “New Notification.”
- Choose “Sensor Activity.”
- Name your notification rule.
- Select the sensors you want to monitor.
- Can’t find a sensor? Make sure activity monitoring is on. Check “Turn sensor activity monitoring on/off.”
- Pick when you want notifications:
- “At All Times”: For every sensor activation.
- “Only During the Following Times”: Set specific times.
- Add any filtering you want.
- Click “Add.”
- Add recipients from your Address Book or add a new one.
- Check your settings.
- Click “Save.”